Monday, January 25, 2010

Cute and Quick Clover Leaf Rolls

The title of this post might be misleading. I made these rolls the old fashion way, with yeast, and rising, and kneading, and baking, but I made a lot of them, and then I froze them. Now when I need a handful of cute, and delicious clover leaf rolls, I pull out a few, put them in a hot oven with a pat of butter on top of each one, and bake them until they taste warm and fresh all over again (about 6 minutes).

Clover leaf rolls are probably the easiest of all the "fancy" yeast rolls. There isn't a whole lot of rolling, twisting or shaping. To being you'll make a yeast roll recipe (see below).

Once you are ready to make your rolls. Divide your dough in half. Each half should make twelve rolls. Each roll is made of three evenly sized balls, pinched together and baked in a lightly greased muffin tin.

To get my balls roughly the same size, I use kitchen shears to cut each half of original dough in half, and each of those halves in half again. This should give you four pieces of dough. Then cut those into thirds. Now you'll have the base for 12 rolls. Cut each of those into three equal pieces. Roll the pieces into a ball shape and pinch the three together on the bottom and place in your pan. If you don't pinch them together, it is likely that your rolls will fall apart after they bake. Once baked, eat a few fresh, let the rest cool, and store in a freezer Ziploc bag, or other freezer container.

Do not try to use the Food Saver or other vacuum bag system. They will suck the air out of your rolls, and will not make for a tasty treat.

Yeast Rolls
4 1/2 cups all purpose flour (give or take to make your dough the right consistency)
1 pkg active dry yeast
1 cup milk
1/3 cup sugar
1/3 cup butter
1 tsp salt
2 beaten eggs

1. In a large mixing bowl, mix together 2 cups of the flour and the yeast. In a saucepan, heat milk, sugar, butter, and salt until just warm, about 120 degrees. Be careful not to overheat your liquids. You butter should be just melting, you might still have solid butter at 120 degrees and that is okay.
2. Add warm milk mixture and beaten eggs to the dry ingredient and mix with an electric mixer on low to medium for 30 seconds. Beat on high for 3 minutes. Using a spoon, stir in as much of the remaining flour as possible.
3. Turn dough on a lightly floured surface and knead in enough of the remaining flour to make a a smooth and elastic dough. *I always knead in too much flour*
4. Shape dough into a ball. Please in a lightly greased bowl, turning once. Cover and let rise in a warm place for about an hour.
5. Punch dough down. Turn onto a lightly floured surface and divide dough in half. Cover and let rest for 10 minutes. You can use this time to grease your muffin tins.
6. Prepare your clover leaf rolls, as described above. Allow rolls to rise in their tin, covered with a towel for another 30 minutes.
7. Bake at 375 degrees for 12 to 15 minutes. Immediately remove from pans and cool on wire racks.

Enjoy!

Sunday, January 24, 2010

A cute bag, one small error.

I bought this fabric a while back with the intention of making a tote bag just big enough for a few Pampered Chef Catalogs, and more recently, my substitute teaching binder. Sadly, I let the project slide to the way-side, finishing Christmas quilts and even a Christmas present that wasn't complete until the middle of this month.

I had cut out the outside and the inside pieces and sewed the inside pocket. Then I cleaned, put it all way, and hadn't looked at again. This week, I decided I would wrap up the project!

I started by making the straps, which took hours to turn inside out. The first one was a breeze. I used a safety pin to push the fabric through. One the second strap, however, my safety pin popped off about half way through. I was too far along to pull it back out and start over, and I wasn't far enough along to make it an easy fix without a safety pin. I was half temped to just start over, but I thought that would be quite a waste, so I just kept working. Eventually it came out, and after a quick ironing they looked great.

I sewed the straps to the outside, and sewed the pocket to the inside. I then matched up the liner and the outside and sewed it all together.

Then I noticed my error, my straps go the wrong way. When the bag is full, and I throw the tote over my shoulder, the straps have to twist behind so the bag will lay flat. I think I have a solution. I think I will gather the straps at the top with a two to three inch tube of fabric, scrunchy style. Then I will be able to throw my bag over the shoulder that way and all will lay correctly!

That was really something I should have considered more carefully before I started the project. Overall, however, I'm pleased with my bright and crazy bag. And it's the perfect size for my days spent at the schools!

Friday, January 22, 2010

Yummy Fajitas, with homemade seasoning

Mexican food is always one of my favorites. I love all the spices. I love the saltiness of the tortilla chips. I love fajita with all the veggies and colors. With homemade fajita seasoning, we got to skip out on too much salt and msg.

Fajitas
1 Green Pepper
1 Red Pepper
1 Red Onion
1 lb boneless skinless chicken breasts

Cut the chicken and veggies into strips. Cook chicken in about a Tbs of oil in a large skillet or wok. Add vegetables and cook 3 or 4 minutes until cooked and crispy. Add seasoning (see below) and 1/4 cup of water.

Seasoning
1 Tbsp chili powder
1/4 tsp garlic powder
1/4 tsp onion powder
1/4 tsp crushed red pepper
1/4 tsp dried oregano
1/2 tsp paprika
1 1/2 tsp cumin
1 tsp salt
1 tsp pepper

Blend spices and herb.

Serve with warm tortilla, cheese, salsa, guacamole, refried beans, and torilla chips!

Thursday, January 21, 2010

O, Mama Mia, Lasagna!

A few nights ago was lasagna night. On my day off, I spent the afternoon boiling homemade spaghetti sauce, being careful to leave out the onions because Alex can pick them out in anything.

I served them with crescent rolls out of the can. I turned half of them in to garlic crescents with some homemade garlic butter, and the other half into dessert. I sprinkled the crescents with semi-sweet chocolate chips before baking them. They made for a very simple and tasty dessert treat.

No-Onion Lasagna
1 lb ground beef
2 cloves garlic, pressed
1 cup of diced tomatoes
1 cup of tomato sauce
6 oz can of tomato paste
2 tsp dried basil
1 tsp oregano
6 lasagna noodles
1 beaten egg
15 oz ricotta cheese
1/4 cup fresh grated Parmesan cheese
6 oz shredded mozzarella

1. To make sauce, brown meat with garlic in a large, deep skillet. Drain fat.
2. Add undrained diced tomatoes, tomato sauce, tomato paste, basil, oregano, and a dash or two of pepper. Bring to a boil, cover and let simmer for 15 minutes.
3. Cook noodles according to directions on the box. Drain and rise with cold water.
4. Combine eggs, ricotta cheese and Parmesan in a medium sized bowl.
5. In a small rectangular pan, layer two noodles, filling, and sauce. repeat two more times.
6. Bake at 375 for 30-35 minutes. Let stand 10 minutes before serving to allow for cooling and easier cutting.

Enjoy!

Wednesday, January 20, 2010

Cookies and Running

So, after a holiday full of baked goods, and a new year full of too easy to break resolutions, I am trying to start running again. It's always been my goal to run a 5K, which I know is nothing for a runner, but it's huge for me. When I was my fittest I would run a 4 mile country block. So, I'm trying to do it right and I have started again with the couch to 5K running plan from Cool Running.

My biggest problem, comes when I get stressed out. It's not necessarily that I like to eat cookies, but I like to bake them. And I like to use my seasonal (Valentines Day) platters to decorate my house, but then the cookies are set out and mindlessly eat them... ALL.

These are Peanut Butter Sugar Cookies. They turned our light and fluffy and super-delicious. I used real butter, all white sugar, and fine vanilla extract, which gave them a warm vanilla taste.

Now it's cold here, and even though the snow has melted, the days are dreary, moist and cold, which keeps you chilled tothe bone, even when you're out running. I'm waiting until the temperature reads above freezing and then I'll venture out. After lunch seems just about right.

Peanut Butter Sugar Cookies
1 cup butter
1 1/2 cups sugar
2/3 cup peanut butter
2 eggs
1 tsp. vanilla extract (I used Pampered Chef brand) and if you're interest in buying some, contact me
2 1/2 cup flour
1 tsp baking soda
1/2 tsp salt (I use Kosher salt, I like the way the larger crystals bring more intense saltiness)
sugar for rolling

Preheat oven to 350 degrees.
Cream together butter, sugar, and peanut butter. Add eggs and vanilla. I generally add the baking soda and salt to my moist mixture and then stir in the flour. This keeps me from dirtying an extra bowl and allows the salt and soda to get mixed in well.

Roll into tablespoon sized balls and dip in sugar. Place cookies on a cookie sheet and press with a fork, once in one direction and once in a crosswise direction. If you fork gets sticky, dip in excess sugar or a cup of water.

Bake 12-15 until cookies are a light golden brown. These cookies will not be as dark as traditional peanut butter cookies. Cool completely.

Saturday, January 16, 2010

And then the fog cleared

Driving home tonight, the state was covered in a thick dark fog. I drove the 50 minutes from my parents to my own home with white knuckles and at the posted speed limit. It was a scary trip, but I'm home now, safe and sound.

Tonight I cooked dinner with my mom and ate with her and my dad. We had Basmati rice and Satay Peanut Sauce over chicken, onion, broccoli, green pepper, carrots and water chestnuts. It was very good. Alex is spending his day and evening with his friends watching football. I should go an check the score. It will give me a good idea of how much celebrating he'll be doing tonight!

Thursday, January 14, 2010

One needy kitten


Today, I would like to write about one of my kittens, Racer. When we brought him home he hid behind the water heater anytime we walked toward him. In this tiny picture, you can see him in the space between the the white water heater, and the rusty-looking pipes.

Once he got used to his new home and his new family, he became more affectionate. He would play with us and sit with us. He's always been the best at bedtime and will cry to let you know that he needs fresh food or water.

Recently though, he has become more and more needy. He likes to be carried around like a baby. I have seriously considered investing in a baby sling so that I can hold him and still have my hands free for cooking, cleaning and crafting.

I'm not sure if he would stay in a sling, but I have a feeling he would, and that he would love it. When he's not being needy, he is an independent player. Here he is playing with one of his Christmas presents from his human cousins. It's his second toy just like this one, and he played with the first one until it was torn to pieces.

Besides mothering my kittens, I have been trying to develop some more cooking skills. This week I rolled my own egg noodles for a warm meal of chicken and noodles and mashed potatoes.

The noodles were okay. A little chewier than I had hoped, but I am still learning to work with dough. I think it takes some practice and some patience.

I started a meal planning calendar, which I think will help our grocery bill each month, and will help us to have healthier dinners.

I'm considering trying Weight Watchers again. I'm considering the core plan, which is a list of foods you can eat. You don't have to count points that way, but it would mean eating significantly less of some of my favorite things!

Wednesday, January 6, 2010

A well rounded dinner, kind of.

A few nights ago, Alex and I decided we wanted breaded pork tenderloin sandwiches for dinner. I headed off to the grocery in search of a week's worth of meal planned groceries and some yummy tenderloins. I looked in the meat case and when I could fine none there, I headed to the frozen food section.

Our grocery had one type of frozen pork tenderloin, Pete's Pride. And while those are yummy pork fritters made in my hometown (not where I live now), they are a little lacking in the porky wholesome goodness we were hoping for. So I called Alex, who was out and about, and asked if he could swing by the little butcher shop where our friends had recently purchased these perfect, giant breaded tenderloins.

When he got home and I opened the package to start dinner, I was shocked by the naked, almost ground looking piece of meat that stared back up at me. I guess, a tenderloin for sandwiches starts as a pork chop and is run through a cubing machine, which kind of grates the top and flattens the piece of meat.

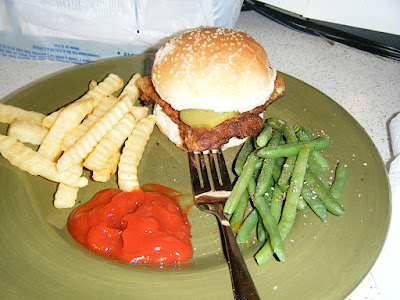
I quickly grabbed my Better Homes and Garden basic cookbook, which is my go to for all basic cooking needs, and read how to make homemade tenderloins. I finally got to use my new meat tenderizer and mallet. I made a flat patty, cut one tenderloin into four sandwich-sized pieces, floured, egg-washed, and breaded each patty, and pan-fried them in a little vegetable oil. I served them with crinkle cut french fries, green beans. Alex ate two.

The lessons I learned from this pork tenderloin experience are:
  • The flatter the better. I should have kept pounding the patties. They were a little thick for pork fritters and they shrunk up when I cooked them, so they were not bigger than bun sized, which is what I prefer.
  • Sometimes it's better to double your breading, even if it leads to more waste. By the last tenderloin, the egg-wash was practically gone, and I had to add more breadcrumbs. I should have just doubled it to start.
  • Ask your butcher questions. If you don't see something you want, ask about it. Maybe your cut of meat just needs to be put through another machine.
I still have a whole tenderloin food saved and in the freezer, so I'll definitely be trying this one again!

Tuesday, January 5, 2010

Ah Ha, The Peanut Butter Chocolate Chip Muffin

As I mentioned in the previous blog, I would love to share the recipe for these yummy Peanut Butter Chocolate Chip Muffins.

They turned out just rich enough to eat. They could make a fun breakfast or dessert. This picture is of a day old muffin.

I really liked theses muffin tops, which is no surprise, because I typically like the tops. I wonder if there is a pan for only making muffin tops? There must be. Some bakeries sell the muffin and tops, and I just can't imagine what they would do with left over muffin bottoms.

Peanut Butter, Chocolate Chip Muffins
Yield 12
Ingredients
oil, butter, Pam for greasing the pan, or use muffin liners
2 cups all-purpose flour
1 Tbsp. baking powder
1/8 tsp. salt
Heaping 1/2 cup firmly packed brown sugar
2 large eggs
3/4 cup milk
6 Tbsp. oil or melted, cooled butter
Heaping 1/2 cup peanut butter
1 1/2 cups semi-sweet chocolate chips

1. Preheat the oven to 400 degrees. Grease 12-cup muffin pan.
2. Mix together flour, baking powder and salt in a large bowl. Add the brown sugar.
3. Beat the eggs is a large bowl. Beat in milk, oil, and peanut butter. Make a well in the center of the dry ingredients and pour wet ingredients into well. Stir until combined, but do not over mix. Gently fold in chocolate chips.
4. Spoon batter into the prepared muffin pans. This should be the perfect amount of batter for 12 muffins, so the wells will seem very full. The muffins only rise a little. Bake in a preheated oven for about 20 minutes. Muffins should be well risen, golden brown, and firm to the touch.
5. Let the muffins cool for 5 minutes in the pan. then serve warm or transfer to a wire rack to cool completely.

These microwave well for a fresh muffin flavor, but they are best right out of the pan. Enjoy!

Sunday, January 3, 2010

Seriously, I should snap some pictures

Today, I had my final Christmas celebration for the holiday season. Alex's mother's family met to have brunch, visit and open presents. It was a lot of fun to visit with his grandma, aunts, uncles, and cousins.

I baked some wonderful muffins. The recipe was adapted from a crunchy peanut butter muffin. Instead of crunchy peanut butter with extra peanuts as the recipe called for, I used creamy peanut butter and added semi-sweet chocolate chips. Yum!

Soon, I'll post a picture and the recipe.

Friday, January 1, 2010

A New Craft Room, A New Year

Today I put my craft room/office together. When Alex and I bought this house, we made the decision that the smaller of the two spare room would be mine, and the larger room could be his office, but he would have to move the day bed in there for guests.

Well, within weeks of our move in, we had a friend of Alex's move in and take over the bigger of the two rooms. That was fine. Alex and I settled on turning the smaller room into an office. We crammed our desks, computers, chairs and stuff into this little room.

Our roommate received a better office in a house full of boys, which was also more to his bachelor liking, and moved out at the end of December. Alex moved his things out of my room and into his in a flash. I've spend the last two days trying to reorganize, and decorate my room. It's going to be a great way to start the new year!